
Instructions to Alter Train Case


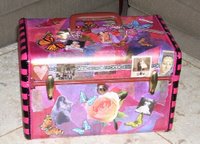
The altered train cases I do are inspired by an article I once read in the Cloth Paper and Scissors Magazine-Summer 2005. The article is titled "Time Travel" by Linda Linn. Here are the instructions that I use.

Supplies:

Vintage train case-or also called old cosmetic case-luggage-I usually get them off ebay but I did find one once at an antique store for 10.00.

Acrylic Paints-and Paint markers are nice to do detail work

collage elements

gel medium

polyurthane to protect-

You paint it as desired. I usually put a couple of coats to increase durability.

You add collage elements with the gel medium. Use a damp, soft rag to keep it clean and without fingerprints and smudges

Do detail work with paint markers

Coat with the polyurthane-allow to dry. Repeat a couple of times to increase durability-so it can actually be carried as luggage and survive.

Add some luggage tags. I have used soldered charms I made, old keys, all kinds of things to hang off the handle. Have fun with it.

Comments

Zoe's Art Stuff said…
Hello! I bookmarked you a while back and I used your tutorial post on printing on fabric using your laser printer, card stock and masking tape. I have been doing that now (lots and lots) ever since, and I just thought I should pop over here and thank you. Your stuff is great, by the way. I'm really enjoying it. Your vintage traveling case makes me remember that I have a couple of those, just lying around in storage... Better get to work!

Popular posts from this blog

Paper Flowers and Fabric Flowers

Well, I'm kind of in a creative funk again. I hate it when this happens! I'm so glad that next weekend I am going to Fredricksberg, TX again to the trade days. I know it will inspire me in all kinds of directions. Meanwhile, while I am trying to get my groove back........I have been making a lot of little short term projects in the paper department. I made this little posey pin from faux vintage post/letters etc papers from the scrapbooking department. I actually wore it yesterday on my jacket. Then I spotted this book on Fabric Flowers by Elizabeth Helene Searle at the fabric store and I had to get it. I used her instructions to make this first fabric flower. I want to try several of her other flowers instructions. Now, what will I do with them? Who knows? Does it really matter if I am enjoying myself? Probably everyone will get fabric or paper flowers for Christmas! Heehee Have a great day.

Funky and Proud

Just wanted to say a big thanks to all who responded to the last post. You are all so smart and insightful. I think after much thought and several good conversations with my friends, I feel better about this whole idea. My conclusion, I do many different things that fall under the "mixed media" category...even the jewelry. I have this never ending curiosity and desire to learn new techniques. Whatever I am working on at the moment is satisfying my creative cravings...if not, I don't do it. If I don't enjoy something....I don't do it. It is that simple. The "Funky Art Queen" thing? It occured to me that the people that would be put off by my d.b.a. would be those that most likely would not be drawn to my art in the first place. Thanks again. I just love every one of you. Next blog......not all about me I promise. HUGS

Melon Burst Pantone Quilt Challenge 2023

I entered my first quilt challenge this year! I was inspired by a friend of mine that had entered this challenge so I decided I would give it a try. The challenge is called Pantone Quilt Challenge 2023 and you can check out all the yummy shades of magenta at #pantonequiltchallenge2023 on Instagram. This challenge is hosted by  Sarah Ruiz of https://saroy.net/ and Elizabeth Ray of https://www.instagram.com/elizabethkray/?hl=en When I learned about the challenge, I headed over to Missouri Star Quilt Company online and purchased the Kona Crush for this piece. I was not sure what I wanted to pair it with for several days until I finally decided on several tones of greens.  So I started out with these pieces. I had always wanted to see how to make the flying geese in a curve. I managed to figure out a way by using wedged pieces in between each "goose"? I have since learned that there is another way by using Foundation Paper Piecing. All the things we learn with each quilt, right